
This is default featured slide 1 title

Go to Blogger edit html and find these sentences.Now replace these sentences with your own descriptions.

This is default featured slide 2 title

Go to Blogger edit html and find these sentences.Now replace these sentences with your own descriptions.

This is default featured slide 3 title

Go to Blogger edit html and find these sentences.Now replace these sentences with your own descriptions.

This is default featured slide 4 title

Go to Blogger edit html and find these sentences.Now replace these sentences with your own descriptions.

This is default featured slide 5 title

Go to Blogger edit html and find these sentences.Now replace these sentences with your own descriptions.

Thursday, June 14, 2012

Submit a Sitemap

This is very important  for your site to be searchable on Google  basic SEO tricks..
Go  to Webmaster tool

Find Optimization click Site  maps


Click Add Sitemap
Now use this:

For Blogs with posts less than 500

    atom.xml?redirect=false&start-index=1&max-results=500

             If your post count is more than 500 but less than 1000 then submit the following two sitemaps instead:

For Blogs with posts less than 1000

    atom.xml?redirect=false&start-index=1&max-results=500

    atom.xml?redirect=false&start-index=501&max-results=500


For Blogs with posts less than 1500

Similarly if your post count is greater than 1000 but less than 1500 then you will submit the following sitemaps and so on...

    atom.xml?redirect=false&start-index=1&max-results=500

    atom.xml?redirect=false&start-index=501&max-results=500

    atom.xml?redirect=false&start-index=1001&max-results=500

You have now successfully generated or created the sitemaps. Lets know submit them to Google.


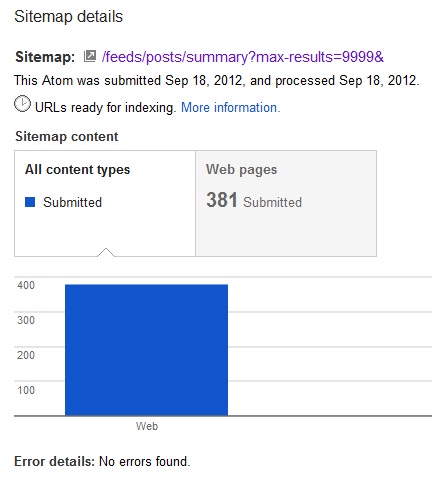
Updated new way to submit all blogpost via feed   submit  this.

/feeds/posts/summary?max-results=9999&


How many Page Google See on your blog


5 things You Like and Hate About Windows8


5 Things you will Like on Windows 8


5 Things you will Hate on Windows 8..


Ultraslim Ultrabook Laptops Get Cheaper

Ultraslim Ultrabook Laptops Get Cheaper

It’s happening. Super-slim Ultrabook prices are edging closer to the average range of standard laptop prices.
For instance, Lenovo IdeaPad U-series Ultrabooks officially announced on Wednesday start at $749, and other Ultrabooks announced by Asus, Sony, and Toshiba are also more moderately priced, starting at just $600--with some tradeoffs, of course.
So far, price has been the major barrier for Ultrabooks, the new class of laptops designed to balance portability, power, and price. Most of the first wave of Ultrabooks had a $900-to-$1,000 (or even higher) starting price, so compared to many laptops selling for around $500, these ultrathin laptops haven’t been widely received as great bargains.
This is changing with more newly announced Ultrabooks ranging from $599 to $799. The average price of laptops in March 2012 was $725, if you include Apple notebooks, but $508 for just Windows PCs. So these new Ultrabooks are actually very close to the average prices as documented by NPD and Laptop. Here’s what you’ll get for these cheaper Ultrabook prices:

Lenovo IdeaPad Ultrabooks Shave About Half the Price

Lenovo IdeaPad U410 UltrabookLenovo IdeaPad U410 UltrabookThe recently announced Lenovo IdeaPad U310 and U410 Ultrabooks start at $749 and $799 respectively. For those prices, you get the latest Intel “Ivy Bridge” Core processors, long battery life, and a thin and lightweight aluminum chassis. The 13-inch U310 boasts a 7 hour battery life, 0.7 inch thickness, and weight of 3.47 pounds. Meanwhile the 14-inch U410 may last up to 9 hours on one charge, is 0.83 inches thick and weighs 4.18 pounds.
They’re not the lightest, thinnest, or most beefed up Ultrabooks we’ve ever seen, but the new U-Series are stylish and more affordable than most others we’ve seen recently, including Lenovo’s original IdeaPad Ultrabook, the U300s, which started at the incredible price of over $1500. The lower U-Series prices are due in large part to the use of a traditional hard disk drive (500GB) instead of a more expensive solid state drive. (A faster 32GB SSD is also available in the new Ultrabooks to speed up boot times).

Toshiba and Sony Ultrabooks Start in the Mid-$700s

Sony VAIO T13Sony VAIO T13Lenovo isn’t the only one breaking the $800 price barrier. Sony’s VAIO T Ultrabooks start at $769.99 for the 13.3-inch model available now, and Toshiba has announced a 14-inch Satellite U840 Ultrabook starting at $749.
While these two laptops meet the lightweight and thinness requirements of the Ultrabook brand (under 0.8 inches thick and weight under 4 pounds), like the IdeaPad U-Series, these Ultrabooks get to the lower price point by using hybrid storage (a small SSD for the operating system and larger traditional hard drive for everything else).
Toshiba Satellite U840Toshiba Satellite U840Otherwise, both Ultrabooks sport aluminum casing and an array of full ports including USB 3.0 and HDMI. The Satellite U830 adds a backlit keyboard and HD display, while Sony points out the VAIO T’s 7.5-hour battery life.

Asus Ultrabooks for Under $600

Prices on other Ultrabooks are finally fulfilling tech prophesies and dipping to $599 and below--perhaps low enough to give mainstream laptops a run for their money.
Ultrabook News reports than an Asus S46 14-inch Ultrabook will start at $599 while a 15-inch S56 will be priced at $799. The Asus S56, though weighing in at a less portable 5.07 pounds, will have a few high-end options including: Intel Ivy Bridge Core i5 or i7 processors, an NVidia GeForce GT630M graphics card, and hard drive options of 256GB SSD or 1TB HDD.
Here’s an informal hands-on with the S56, courtesy of ndeviltv.
<p>Your browser does not support iframes.</p>
With Ultrabook starting prices dropping, these laptops may finally find their place among the masses. There will still be more expensive Ultrabooks with more innovative or high-end features to choose from, but it's nice that there are options for more affordable Ultrabooks now too.

Wednesday, June 13, 2012

How to Disabled Windows UAC "User Account Control Settings"


Maybe you was annoyed on Windows UAC,cuz every time you install something. It Pop-up and asking "Do you want...?". Even you Run it in Admin user. How to Disable it?

(On Windows 7 Vista : Premium, Ultimate Only )

Click Start find something like this.."Getting Started"


You you see the UACand you can change the setting that you want..


Bitdefender DNS Changer Detector

 In November 2011, the Federal Bureau of Investigations took over a series of DNS servers that had been used by cyber-criminals to redirect users’ traffic to potentially risky locations they control. However, as disruption of the DNS system has a huge impact on the way PCs communicate over the Internet, the Bureau substituted the rogue DNS servers with valid ones to keep resolving internet names.


This tool detects and repairs rogue DNS settings that have been altered by DNS Changing malware. For more details about this tool, as well as about the DNS Changer family of malware, please visit the dedicated article on the Hot for Security blog.


Auto Mac Changer VBS Scripts By Mr.MacAddress

First you need to enable your Telnet for Windows 7 user.
Click this link: How to Enable Telnet on Windows 7
 for old Windows Edition  like Windows XP you NO need to do this ;)


Paste this Code on  Notepad ,Change the BOLD RED XX thats stand for your Working MAC, then  "SAVE AS" CHANGEMAC.vbs or Anyname.vbs

Results for: how to hack bm622i tut free


Thursday, June 07, 2012

How to transfer all blog post and comment to a New Blog!

If you want to transfer all your blog post and comment to your new create blog
Go to Setting/Basic/Blog tools

 Select if you want to download all comment and post click Export


 Now Go to your newly made blog and import.

Download Movie Maker 2.6

If you don't have a movie editor try Windows Movie Maker 2.6 its runs with Window 7

Windows Movie Maker is a very accessible video editor that can deliver professional-looking results in a few simple steps.

The interface is easy to use by someone with any level of experience in the multimedia department.

The entire process is divided into three main parts - capturing a video, editing the movie, and finishing it.

In the first step you can import audio, video or music. Luckily, the Movie Maker supports most commonly used formats, including WAV, MP3, WMA, AVI, MPG, JPG, BMP and PNG. Plus, it's possible to drag and drop files in the interface.

Once you organize these files in the Storyboard below, you can start editing your movie, by adding video effects, video transitions, titles, and credits.

Everything is very simple to accomplish. In the Storyboard you view the separate files, so you can drag a video effect to a box over a clip, or a video transition between two clips.

The video effects look great, but some of them may damage the quality of your video clip. For example, adding the "Film Age, Oldest" effect to our video caused it to significantly slow down, but it worked perfectly on our picture.

When it comes to text, you can add a title at the beginning of the movie, or credits at the end of it, as well as a title before, after or on a selected clip.

Finish the movie by sending it to a DV camera, or by saving it on your computer (in the WMV format).

Windows Movie Maker uses a moderate amount of memory resources, so it should work on weaker computer systems.

In conclusion, if you want to create a great-looking movie without having to learn complex video editing tools, then you should be very happy with what Windows Movie Maker has to offer.


Built in WebCam Problem Solve

I have a problem on built webcam after upgrading the old Windows to Windows7. The Webcam is "Not Detected Hardware" or Uninstalled. As we know Windows 7 has all drivers and it can auto update any driver available.

Most Laptop with this trouble are:

  • Asus
  • Acer
  • Samsung
  • Neo
As you see no Webcam is detected except for "Base System Device " (system device PCI or Card reader)
Device Manager....


On Device and Printers..

Like a built in WiFi device , built in WebCam need a hardware enabling device. The default  key is Fn + F10 ,after pressing  these key you will notice your webcam "Lights On" or Try any Fn+ combo key F1 to F12 


NOTE: Look for Product Manual on How to Enable WebCam . Now its working vice Manager and Device and Printers.


 Testing the WebCam you can download Vimicro USB Camera . Its allow you to take capture photo and videos.


How to restore Windows 7 Icons and open with

Did you accidentally change the option or setting when you trying to open a files?


Then after selecting open with your file turn something like this.. Same Icon


How to fix?

This is 100% effective I personally use this trick to fix my customer PC/Laptops with Open with Problem.

You can uninstall the default open with program on control panel- add remove program  to recurse the open with file.

But in some cases open with MS Paint or Notepad you can't uninstall them  you can try to do the trick below. 

1.Download these two files.
lnk_fix_w7
Rebuild_Icon_Cache

2.After downloading the 2 files Open Task Manager by Pressing  Ctrl+Shift+Esc.Go to Process" End Process" explorer.exe


3. Click File tab then click New Run-Browse click all files open lnk fix 7


You must know where you place your downloaded files.


4. Same as step 3  New task then find Rebuilt_Icon_Cache then Restart.it will ask you y/n  type Y 


Finish!!  all back to default .


Make your Windows boot faster

1. Run "msconfig"
2.By default, it's 30, which means 30 seconds of wait time before boot. This can be changed, make it 3 seconds. (Note: if you have more than one operating system, this means the wait time to startup to the highlighted Operating System. Sometimes you might want a bit more than 3 seconds than you can opt 5 or 10 seconds). Apply and click Ok.